Exchanhe Online Connector is an Important topic for Microsoft 365/ Exchange Online Administrator and this is frequesntly asked in technical interview.
I this article we will understand the below points,
- What is connector in Exchange Online?
- Why do we need connector?
- How connector work
- Types of connectors
- When a connector is required
- How to create a connector step by step
- Important connector settings
- Troubleshooting
- PowerShell commands
- A frequesntly asked interview question and answers
What is connector in Exchange Online?
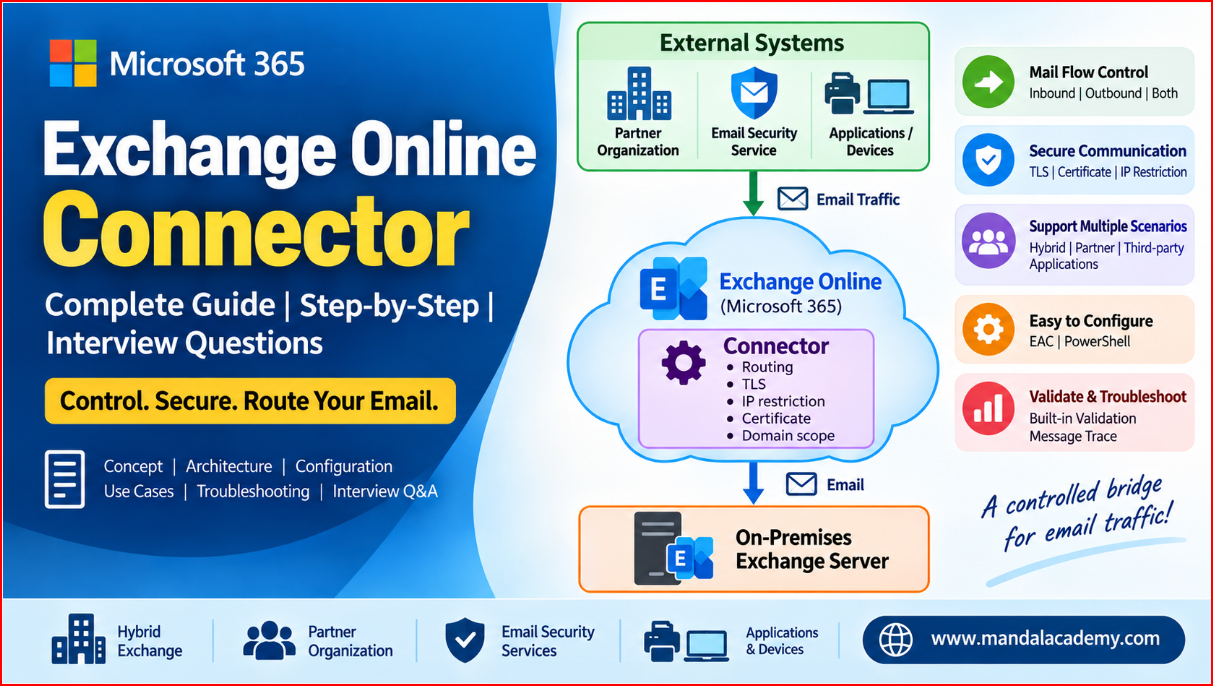
Exchange online connector is a mail flow infrustructure that controls how email messages are routed between Microsoft 365 and another email system like - Exchange online on-prem.
For Example:

Connector can be used to control email flow between:
- Exchange Online and on-premises Exchange
- Exchange Online and partner organizations
- Exchange online and third party email services
- Printers, scanners, applications and devices.
- Security and email filtering services.
*** As per Microsoft most organizations do not need connectors for normal Internet mail flow. Connectors are mainly required when a specific mail-flow or security scenario requried them.
Graphical view of an Exchange Online Connector:

Why Do We Need Connectors?
Connector are useful when we need more control over our email routing.
Some common scenarios/ examples are below,
- Hybrid Exchange: If an organization has both On-premises Exchange & Exchange Online, connectors are used to support mail flow between two environments. In a hybris deployment they need required connectors.
- Partner Organization: Suppose your company exchange email with a bank, then you may need,
- TLS encription
- Specific partner domains
- Specific IP addresses
- Certificate-based authentication
- Third Party Email Security: Example: Internet -> Email Security Service -> Exchange Online.
- Connectors can be configured to control the flow between Exchange Online and the third-party service.
- Printers and Applications: A scanner or appliation may need to send email through Microsoft 365.
- Example: Scanner -> Exchange Online -> Internet Recipient
- Microsoft provides connector-based SMTP relay scenarios for device and applications.
Types of Connectors:
| Connector | Direction | Example |
| Inbound Connector | External -> Exchange Online | Partner -> M365 |
| Outbound Connector | Exchange Online -> External |
M365 -> Partner |
| Partner Connector | Secure martner mail flow | Bank <-> M365 |
| Organization Connector | On-premises <-> M365 | Hybrid Exchange |
Inbound Connector: An inbound connector controls email coming into Exchange Online from a external source.
- Ex: External Organization -> Inbound Connector -> Exchange Online
- It can identify the sending organization using things such as -
- IP Address
- Certificate
- Sender Domain
Outbound Connector: An outbound connector control email going from Exchange online to another email system.
- Ex: Exchange Online -> Outbound Connector -> partner/ On premises Server
- It can user routing methods such as a smart host and can enforce TLS requirements.
How to Create an Exchange Online Connector:
Scenario: Your organization has an on-premises Exchange server and wants to send mail to Exchange Online.
Step 1: Open Exchange Admin Center (EAC), then navigate to Mail flow -> Connectors
Step 2: + Add a connector. The connector creation wizard will open.
Step 3: Select the Connection From
- Connection from: Your organization's email server
- The destination will be: Office 365
- Click Next.
- Please note: Microsoft current connector documentation uses this flow for an on-premises to Microsoft 365 connectors.
Step 4: Enter Connector Name
- Provide a meaningful name, like: OnPrem-to-ExchangeOnline
- Add a description, if it's required. Example: Connector for from on prem to Exchange online
- Click Next
Step 5: Configure How Microsoft 365 Identifies Your Email Server
- Exchange online need to know that the incoming is really coming from your organization's email server.
- Depending on the scenario we can user the below,
- Option 1 - Certigficate
- Microsoft 365 verifies the certificate presented by the sending server.
- Example: mail.contoso.com
- Option 2 - IP Address
- Microsoft 365 identifies the sending server by its public IP address.
- Example: 203.0.113.10
- Choose the method that matches your organizations architecture and security requirements.
Step 6: Confugure Security: Security settings are extremely important. Depending on the scenario, you can configure:
- TLS Encryption
- Certification Validation
- IP address restrictions
- Domain restrictions
For secure partner mail flow, connectors can require TLS and can restrict accepted mail based on partner IP address or certification.
Step 7: Validate the Connector.
- After configuration the connector, Exchange Online can validate the configuaration. Provide a test email address and
- Example: test@mandalacademy.com
- The validation process checks whether the configured mail flow works correctly.
Step 8: Review the configuration
- Before creating connector, carefully review,
- Connector From
- Connector To
- Routing
- Security
- IP Addresses
- Certificate
- Domains
If everything is correct then select, Create connector.
Step 9: Test Mail Flow
- After creating connector, send a test email.
- For example: On-premises user -> Exchange Online -> Test Recipient
Check:
- Message Delivery
- Message Trace
- Connector Status
- SMTP/TLS behaviour
- Exchange message header
Connector Validation:
Connector validation is an important troubleshooting feature.
Navigate to: Exchange Admin Center -> Mail Flow -> Connectors -> Select Connector -> Validate
Micrisift recomends validating connectors and ensuring required connectors are turned on.
POWERSHELL: Exchange Online Connector
Exchanhge online connectors can also be managed using PowerShell.
First connect to Exchange Online: Connect-ExchangeOnline
View Inbound Connectors: Get-InboundConnector
View Outbound Connector: Get-OutboundConnector
View Detailed Connector Information: Get-InboundConnector -Identity "Connector Name" | Format-List
Create an Inbound Connector: New-InboundConnector -Name "OnPrem-to-ExchangeOnline" -ConnectorType OnPremises -SenderDomains * (The exact parameters should be selected according to the mail-flow and security scenario)
A Real-World Example:
Suppose your organization uses On-premises Exchange.
Public IP: 203.0.113.10
Domain: mandalacademy.com
You want, On-premises -> Exchange Online
The connector can be configured so that Exchange Online acceps mail from the organizations known source, with security such as TLS and IP-based identification.
The mail flow becomes: Users -> On-premises Exchange -> SMTP/TLS -> Exchange Online Connector -> Microsoft 365 -> Recipient
Connector VS Mail Flow Rule:
This is very common interview question.
A connector primarily defines how and where email travels between systems. But a mail flow rule defines what should happen to a message when specific conditions are met.
| Connector | Mail Flow Rule |
| Controls mail routing between systems | Applies conditions/actions to messages |
| Used for external/on-premises mail flow |
Used for message processing |
| Can configure TLS/IP/Certificate restrictions | Can add disclaimers, reject, redirect, modify messages |
| Focuses on connection and routing | Focuses on message conditions and actions |
Common Connector Troubleshooting:
Blog writing in progress.....
Some Important Interview Questions & Answers:
Blog writing in progress.....
Interview Scenario:
Blog writing in progress.....
Remember: Connector = Mail Flow + Routing + Security
If you understands these three areas, you can answer most Exchange Online connector related interview questions confidently.
Comments (0)
No comments yet. Be the first to leave one!